|
Scorpion Vision Software supports Sick IVP 3D Ranger E Cameras
by using
- SickIVPGrab.dll - Scorpion Camera Driver
The following cameras are tested and verified
Prerequisites
- Scorpion Vision Software version 8.0.0.441 or higher is installed
- Ranger Studio package installed. See Release Notes for supported version
- Cameras are configured and detected by Ranger Studio
Note:
- Scorpion camera driver and software is available
under Release Notes
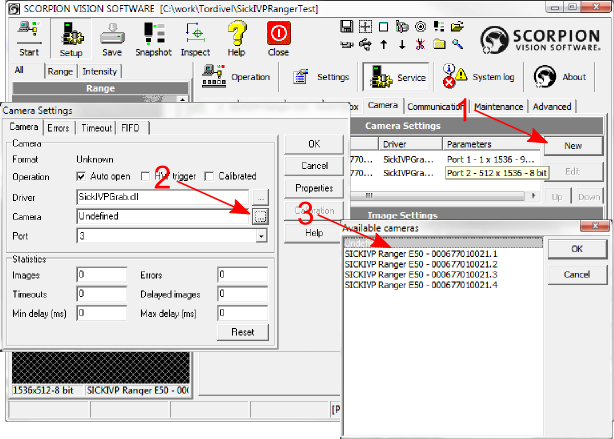
Setting up camera
The Ranger camera has a number of built-in measurement methods - components and
can produce several images. The Scorpion camera driver allows to
grab several images from single camera by representing that camera as 4 virtual
cameras.
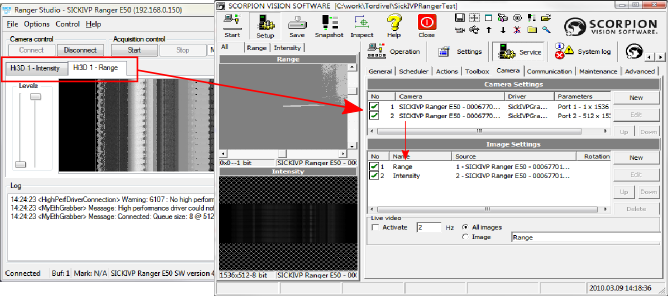
Adding images to the Scorpion:
Property page
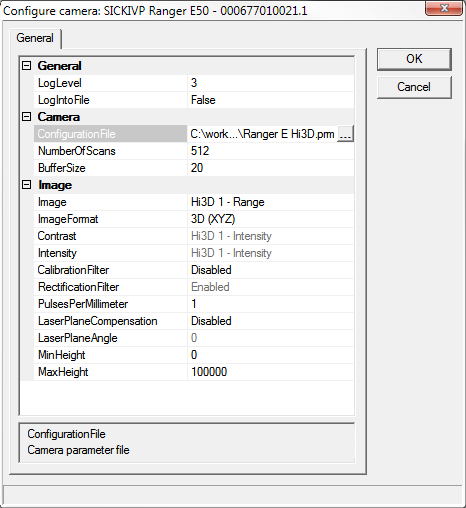
- General
- Log level
- Level 0 suppresses all messages.
- Level 1 issues error and warning messages.
- Levels 2,3,4 issue diagnostic messages.
- Do not use level 4, unless you know what you are doing. Level 4 produces a lot of diagnostic messages and is sutable only for small images or certain types of operations.
-
Also log into file:
- Write camera related messages into log file. Normally messages are
written only on Scorpion console, provided console is enabled for
camera messages.
Note: This setting is not stored in configuration and will be turned off on restart.
- Camera
- ConfigurationFile
The path to the parameter file (saved from the Range Studio).
- NumberOfScans
The number of scans to be collected in the buffers.
- BufferSize
The frame grabber buffer size in Megabytes.
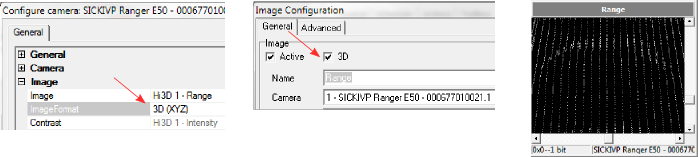
- Image
- Image
The subcomponent to be used for the image.
- ImageFormat
Specifies image output format:
- Grayscale - image will be grayscale bitmap (8 bits per pixel).
- 3D (XYZ) - image will be point cloud (96 bits per pixel).
- 3D (XYZCI) - image will be point cloud with two additional values - contrast and intensity (160 bits per pixel).
- Contrast
The subcomponent to be used for the contrast value.
This value is accessible from python script (see example below).
Available when 3D (XYZCI) image format selected as fourth parameter in 3D point.
- Intensity
The subcomponent to be used for the intensity value.
This value is accessible from python script (see example below).
Available when 3D (XYZCI) image format selected as fifth parameter in 3D point.
- CalibrationFilter
When enabled, sensor coordinates (u,v) are translated into real-world coordinates (x, r).
Calibration is done in the laser plane. If the laser plane is not perpendicular to the
reference plane (XY plane), enable LaserPlaneCompensation and specify laser angle.
- RectificationFilter
When enabled, points are resampled onto a regular grid.
- PulsesPerMilimeter
- If the camera does not deliver mark data, y coordinate
is calculated from scan number in the buffer:
y = ScanNumber / PulsesPerMilimeter
- If the camera configured to deliver mark data, y coordinate
is calculated from
the mark value:
y = (MarkValue - MarkValueOfFirstScan) / PulsesPerMilimeter
- LaserPlaneCompensation
If the laser plane is not perpendicular to the reference plane, enable this to compensate Z and Y for
the skewed coordinate system.
- LaserPlaneAngle
Specify the angle between laser plane and ZX plane.
- MinHeight
Minimum acceptable height value of points in output point cloud.
Note: Calibrated point data may be out of range. Check these values or points will not be visible.
- MaxHeight
Maximum acceptable height value of points in output point cloud.
Note: Calibrated point data may be out of range. Check these values or points will not be visible.
Mark Data
If the camera is configured to deliver mark data, the mark value is used to
calculate the distance between the profiles. See the PulsesPerMilimeter parameter.
Note: When camera is set in the free-run (no triggering) and mark data
is the encoder value, the points will have the same Y coordinate position when encoder is not
moving.
The mark value can be accessed using python script. To get the mark values, the Mark
subcomponent must be selected in Contrast or Intensity parameter. Sample script to print
the mark value from the first point when the Mark subcomponent selected in the Contrast parameter:
    img=GetImageMatr('Range')
    if img<>None:
      if img.isvec() and img.elemtype()=='XYZWVf':
        print img[0][3]
Properties available from Python
The following named properties can be dynamically accessed with
the 'SetProperty' and 'GetProperty' commands:
- 'continuous'
- Enter or leave continuous grabbing mode. This parameter cannot be set via gui page.
- The continuous mode is normally set when using the command in
hw-trigger. Setting continuous modes removes the need for arming the
camera with a Grab command.
Example 1: Start Continuous grabbing
    cam = GetCamera('0')
    cam.setProperty('continuous', 1)
Example 2: Stop Continuous grabbing
    cam = GetCamera('0')
    cam.setProperty('continuous', 0)
Example 3: Accessing Contrast and Intensity values
When selected image format is 3D (XYZCI), in addition to the coordinates, each point has contrast
and intensity value. The following script loops through points and calculates the average
contrast and intensity.
    img=GetImageMatr('Range')
    if img<>None:
      if img.isvec() and img.elemtype()=='XYZWVf':
        cnt=img.dim()[0]
        contrast = 0.0
        intensity = 0.0
        for i in range(cnt):
            contrast += img[i][3]
            intensity += img[i][4]
        print "Average contrast: ", contrast/cnt
        print "Average intensity: ", intensity/cnt
|