|
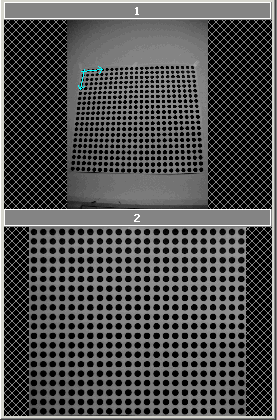
The powerful reference system in Scorpion is also available to Python
scripts. This example shows how a non-linear camera correction description
(a Calibrator) can be utilized from Python to resample an image,
eliminating the non-linear lens distortion.
Note that in normal operation with Scorpion this is never
necessary. All tools that refer to a Calibrator will have similar
corrections done automatically.
The test profile is named CalibResamp and is included with the
Scorpion distribution.
- The toolbox contains a Calibrator
- Results from the calibrator are read in a Python script tool, and are
used to resample the calibrator image
The script:
import arr,geom
#images
name1 = '1'
name2 = '2'
# calibrator object -- we need to get the calib file name from this
calibTool = 'Calibrator'
# dot distance in mm for calibration
dist = 30.0
# Starting UL corner in original image (in millimeters) - just outside blobs
min_x = -dist/2
min_y = -dist/2
# size of resampled image
pix_mm = 1.0 # pixels per millimeter
size_x = 600 # height pixels
size_y = 690 # width pixels
# Get calib object from file, and extract pinCal matrix
calfile = GetValue('System.Profile')+'/'+GetConfigValue(calibTool+'.FileName')
calib = arr.loadArr(calfile)
pinCal = geom.m33f()
pinCal.data = calib.pinCal[0]
# Create grid with requested pixels pr. mm
grid = arr.gridPoints(size_x,size_y,1)
scal = geom.scal(pix_mm,pix_mm)
xlat = geom.xlat(min_x,min_y)
grid *= (scal*xlat)
grid = arr.toFix(arr.objToPix(calib,grid,pinCal))
# Grab image
im1 = GetImageMatr(name1)
# Resample
im2 = arr.toUint8(arr.bilInterpolate(im1,grid))
# Show resampled image
SetImageMatr(name2,im2)
The short description is: a regular grid of positions in the
calibrator coordinates is generated, spaced 1mm apart. These positions
are then converted to equivalent positions in the real image (pixel
coordinates), and the image is finally resampled at these positions,
resulting in an image with both the perspective and the lens artifacts
removed.
There are several things to notice in this script. First, the
"calib" object from the Calibrator tool must be loaded from file.
A Calibrator always saves its results when its "Compute" button is
pressed, and the loadArr routine is used to read this information. A
detailed description of the calib structure is beyond the scope of this
example.
To generate a correction grid, the positions are first given in the
coordinate system resulting from the Calibrator tool (in mm). This grid is
sent to the function objToPix along with the calib object. Note the use of
the toFix function -- this is not necessary, but makes the interpolation
routine work considerably faster.
|
