Camera Property Pages
The Camera Property Pages dialog is displayed when the
Camera Properties item is selected. It is part of the Unibrain Fire-i Camera
Driver and lets you manipulate the exposure, color and basic controls of the
camera as well as read and write from arbitrary camera registers.
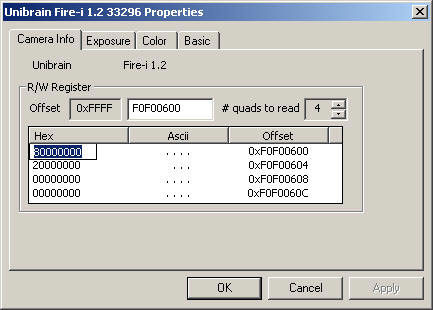
Camera Info
The Camera Info page lets you perform 1394
asynchrounous reads and writes to an arbitrary offset in the camera 1394
address space.
In order to perform a read operation you can specify
the 1394 offset you want to perform a read from and the number of quadlets
to read. Pressing enter will perform the operation and display the results
on a list box below.
In order to perform a write operation you can
directly change the hex value of the respective offset, pressing the F2
button over the value. In the following example we are about to change the
value of offset 0xF0F00600.
Below is a screenshot of the Camera Info page:
Exposure Properties
The Exposure Properties page lets you control the
exposure features of your camera:
| Exposure |
Automatic control of the camera
sensitivity. Also called AE. Higher exposure increases the
difference between dark and bright parts of the picture. Exposure
control is a combined effect of iris and gain controls using an
internal law. It supersedes the manually gain and iris controls to
achieve automatically an average picture level according to the
cursor position. There is no influence on color. |
| Shutter |
Manual reduction of the sensor
integration time to a sub-value of the frame period. Used to reduce
camera sensitivity in high light conditions, to reduce picture blur
for fast moving subjects, and to match camera integration time to
pulsed light sources (fluo) in order to avoid flickering. |
| Gain |
Manual exposure
control by action on the video signal electronic amplification. It
cancels automatic exposure operation and works combined with iris
control. Increasing exposure by gain adds noise to the picture.
There is no influence on color. |
| Iris |
Manual exposure control by
action on the lens diaphragm. It cancels automatic exposure
operation and works combined with gain control. Increasing exposure
by iris reduces the depth of field of the picture. There is no
influence on colour. |
Below is a screenshot of the Exposure Properties
page:
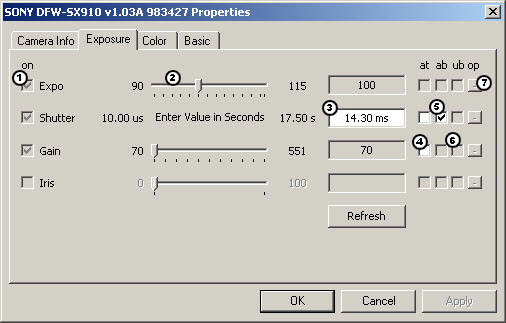
| 1 |
Use this check box in order to turn a feature on or
off. |
| 2 |
Use this slidder in order to change the current value of a
feature when it is in relative control mode. |
| 3 |
Use this edit box in order to type in value when the feature is
in absolute value control mode. The value should be entered in the
units described right next to the edit control. Use a . for decimal
numbers and hit enter in order for the value to be written to the
camera. For example the shutter value is usually in seconds so if
you would like to set the shutter to 100 ms you should type 0.1 and
hit enter. The edit box will then write the value to the camera and
it will update its description to 100 ms which is more readable by
the user. |
| 4 |
Use this check box to set the feature in auto or manual mode.
When checked the feature is on auto mode. |
| 5 |
Use this check box to set the feature in absolute or relative
mode. When checked the feature is on absolute value control mode. |
| 6 |
Use this check box to set the feature in software absolute
conversion mode. When checked the Fire-i software will convert the
relative values read by the camera to more meaningfull and user
readable absolute values. |
| 7 |
Use this push button in order to trigger a one push calibration
of the feature. |
Color Properties
The Color Properties page lets you control the color features of your
camera:
| U/B |
Yellow and Blue
Color adjustment. |
| V/R |
Red and Green Color adjustment. |
| Hue |
Manual adjustment
of the global shift of the colors tints. There is no influence on
white balance, saturation, or sensitivity. |
| Saturation |
Manual adjustment of the
color/black & white ratio. There is no influence on white balance,
hue, or sensitivity. |
Below is a screenshot of the Color Properties page:

| 1 |
Use this check box in order to turn a feature on or
off. |
| 2 |
Use this slidder in order to change the current value of a
feature when it is in relative control mode. |
| 3 |
Use this edit box in order to type in value when the feature is
in absolute value control mode. The value should be entered in the
units described right next to the edit control. Use a . for decimal
numbers and hit enter in order for the value to be written to the
camera. For example the shutter value is usually in seconds so if
you would like to set the shutter to 100 ms you should type 0.1 and
hit enter. The edit box will then write the value to the camera and
it will update its description to 100 ms which is more readable by
the user. |
| 4 |
Use this check box to set the feature in auto or manual mode.
When checked the feature is on auto mode. |
| 5 |
Use this check box to set the feature in absolute or relative
mode. When checked the feature is on absolute value control mode. |
| 6 |
Use this check box to set the feature in software absolute
conversion mode. When checked the Fire-i software will convert the
relative values read by the camera to more meaningfull and user
readable absolute values. |
| 7 |
Use this push button in order to trigger a one push calibration
of the feature. |
Basic Properties
The Basic Properties page lets you control the basic features of your
camera:
| Focus |
Adjustment of
the lens to the subject distance. The distance interval where the
picture is still in focus, before and after the subject is called
«depth of field». Depth of field is increased by closing the lens
iris. |
| Zoom |
Optical
magnification control of the lens. |
|
Brightness |
Constant amount of luminance electronically added to each pixel.
Increasing brightness makes dark and bright parts of the picture
become brighter, but luminance difference between dark and bright
parts stay identical. Used mostly to achieve good rendering of the
dark parts of the picture: black must be as dark as possible, but
they should be a visible difference between black and dark grey.
There is no influence on color. |
| Sharpness |
Control of the
image sharpness. |
| Gamma |
Manual
adjustment of the camera internal correction law for monitor
display. Law is y = x; choose y = 0.45 for normal visual use, or
adjust it according to your monitor. Choice of y = 1, also called
«gamma OFF» is intended for linear camera output and is best for
image processing. |
Below is a screenshot of the Basic Properties page:
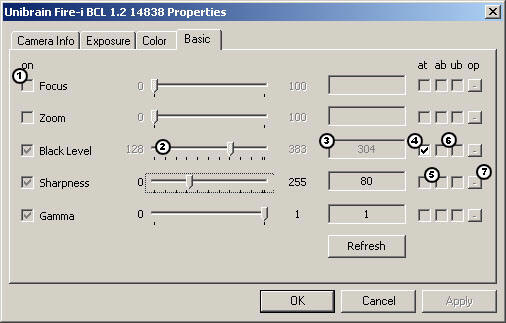
| 1 |
Use this check box in order to turn a feature on or
off. |
| 2 |
Use this slidder in order to change the current value of a
feature when it is in relative control mode. |
| 3 |
Use this edit box in order to type in value when the feature is
in absolute value control mode. The value should be entered in the
units described right next to the edit control. Use a . for decimal
numbers and hit enter in order for the value to be written to the
camera. For example the shutter value is usually in seconds so if
you would like to set the shutter to 100 ms you should type 0.1 and
hit enter. The edit box will then write the value to the camera and
it will update its description to 100 ms which is more readable by
the user. |
| 4 |
Use this check box to set the feature in auto or manual mode.
When checked the feature is on auto mode. |
| 5 |
Use this check box to set the feature in absolute or relative
mode. When checked the feature is on absolute value control mode. |
| 6 |
Use this check box to set the feature in software absolute
conversion mode. When checked the Fire-i software will convert the
relative values read by the camera to more meaningfull and user
readable absolute values. |
| 7 |
Use this push button in order to trigger a one push calibration
of the feature. |
|
