|
All Sony cameras can be triggered by an external signal. The cameras
have a connector at the back, either a BNC or a HIROSE connector.
Configuring Scorpion for HW trig operation requires a number of steps to be
completed. Miss one of them and it will not work
Conditioning the trigger
When configured for HW trig operation, the SONY cameras will output a frame
when the two trigger pins are short-circuited. The center lead of the
BNC carries +5VDC, so it no need for supplying external voltage - even if
the documentation encourages you to do so. The important thing to get
right here is to ensure that the edge is fast rising. If not, multiple
images may be output - corrupting your setup completely.
Tordivel
AS recommends a FAST OPTOCOPLER to be used for providing the closure of the
trigger input.
80-600 Sony HW Trigger Optocoupler Optocoupler 50010
WE CANNOT STRESS THE IMPORTANCE OF USING A FAST OPTOCOUPLER ENOUGH.
STAY AWAY FROM HAZZLE - USE THE RIGHT OPTOCOUPLER.
Configuring Scorpion
The follwing tasks must be completed to setup Scorpion for HW trig:
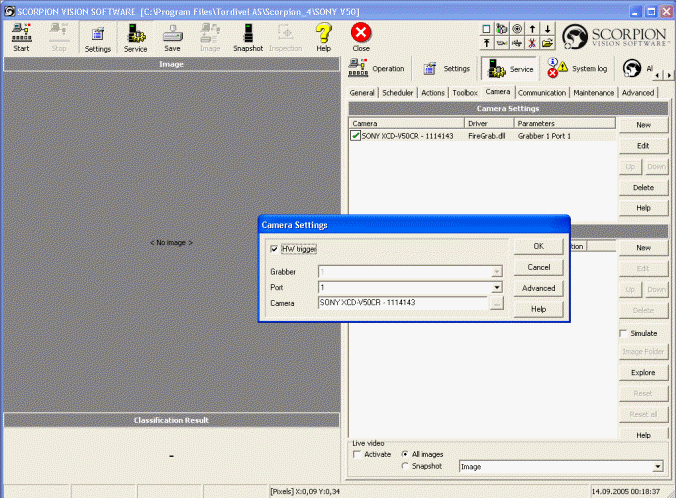
- HW trig must be enabled in the camera dialog
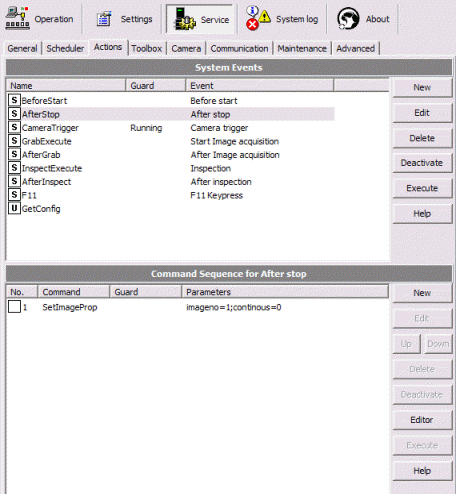
- The BeforeStart
Event must be trapped and relevant command
sequences added
- The AfterStop Event must be trapped and relevant command sequences
added
Enable HW trig in the camera dialog:

Then trap (add) the BeforeStart Event. Add
2 command sequences to
the Event
| Command |
Parameters |
Explanation |
| SetImageProp |
imageno=1;continous=1 |
Set camera 1 in continous mode |
| GrabExecute |
|
Grab an image - that is Arm the trigger |
Command 1 sets the camera in continous mode. This must not be
mistaken for the continous check box found in the camera dialog. The
purpose of the command is to keep the camera armed at all times, outputing a
frame every time the trigger fires.
Command 2 arms the camera the very first time. The continous=1
will ensure that the camera remains armed with no further need to issue
subsequent GrabExecutes.
The BeforeStart Event is fired when the START button is pressed (or the
START command received over the
TdvCmdProtocol -
RS-232 or
TCP/IP)

Finally trap (add) the AfterStop Event. This event is fired when
the user presses the STOP button or the STOP command is received over
TdvCmdProtocol (TCP/IP or RS-232). Add one command sequence:
| Command |
Parameters |
Explanation |
| SetImageProp |
imageno=1;continous=0 |
No more continous mode |
This command will de-arm the trigger when STOP mode is entered

The system is now ready to operate in HW trig!
|