|
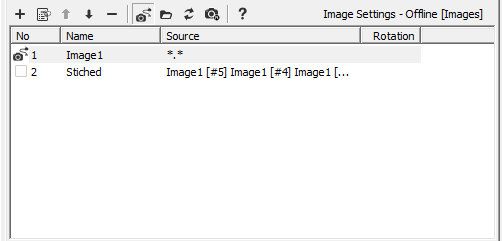
Image Management
 -
Add image -
Add image
 -
Edit image - activate Image Configuration dialog -
Edit image - activate Image Configuration dialog
 -
Selection up -
Selection up
 -
Selection down -
Selection down
 -
Delete image -
Delete image
 -
offline - simulation from files -
offline - simulation from files
 -
online - camera connected -
online - camera connected
 -
select sequence -
select sequence
 -
Reset Camera Sequence -
Reset Camera Sequence
 - help - help
Add Image Procedure
To add image image Activate the Service.Camera tab.
-
Press
in Image
toolbar
-
Set
the image name
-
Select
the correct camera from the camera list box
-
Press
OK to close the image property dialog
-
Another
image pane is now visible in Scorpion
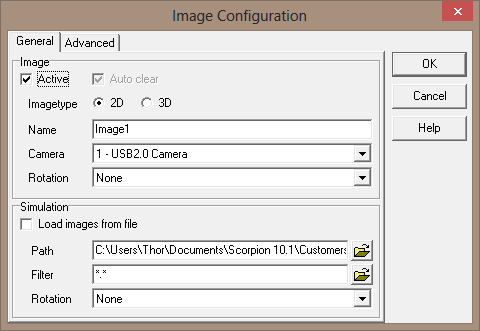
Image Configuration
The following properties are defined in the Image Configuration dialog
- Image
- Active - Used to enable the image.
- Images generated from the
inside of Scorpion shall not be active
- Auto clear - in rare cases you want to uncheck
Auto clear to keep an image
- ImageType - 2D | 3D
- Name - the name of the image specified by the user. The
name is displayed as a caption to the image.
- Camera - Used to select the camera connected to the image when not in simulation mode
- Rotation - defines the rotation of an image
- Note: the rotation consumes CPU - can
reduce the system cycle time significantly
- Simulation
- Load images from file - The image is read from file with
the given path and filter. This image path is also used as source
if you mark the Simulate box in the main image settings window.
- Path - specifies the path to load simulation images
- Filter - filter to select a subset of images
- Rotation - defines rotation for images loaded from files
|
