
Template file
Turn this option on to (re-)read templates from file prior to
matching. Useful e.g. if you have several sets of templates stored as files.
You can save the current template set by pressing Save.
Template/Mask
-
Add and remove templates.
Note: Add will automatically perform a paste if a clipboard region is
given or an image exist on the clipboard.
-
Read bitmap from file
-
Paste bitmap from clipboard to current template or from the template given
by four clipboard points in the image - The four points must be inside the
current ROI.
Note: When the tab is active Ctrl-Z will paste from clipboard to the
active template
 / -
Paste square image - when depressed, pasted images are padded with masked
pixels to become square. Rotated templates will then be more accurate.
Note : The template can also be taken from the resampling tab.
Template Image
- Mask tool selector -Template size in pixels and number of masked pixels
The image menu has the following functions:
- Mask - mask at current point
- Unmask - unmask at current point
- Set center - define the origin of the template
- Reset mask - remove any pixel masking
- Invert mask - flip pixel mask
- Set measure origin - define measure starting point and activate
image measurement
- Measure - activate image measurement
- Freeze - deactivate measurement
- Show info - activate cursor measurement window
- Copy shown image without graphics - copy bitmap to clipboard
- Save shown image without graphics - save bitmap to file
- Paste - paste image from clipboard
- Load from file... - activate a file browser to select bitmap
- Show details - show or hide partial template/subimage

Mouse Mask Operations:
- Ctrl + Left mouse button down - draw mask
- Shift + Left mouse button down - erase mask
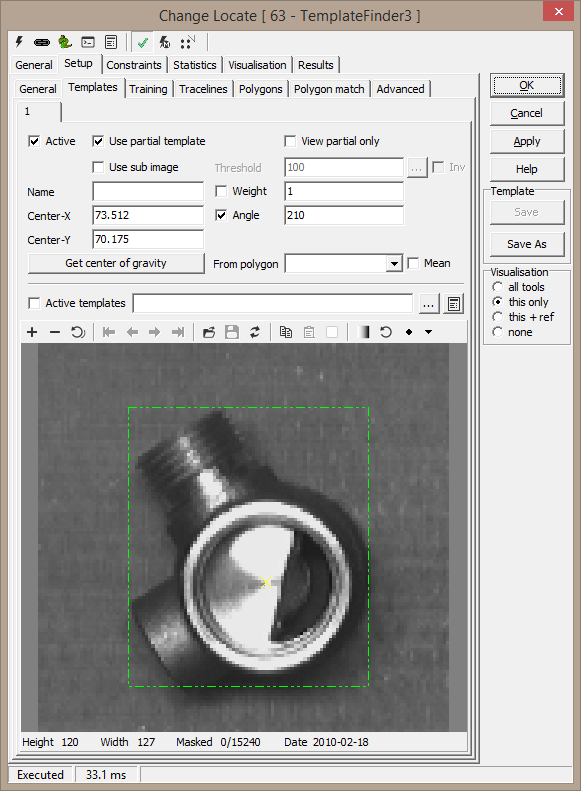
Active - If unchecked the template is not used
Use partial template - use only part of the displayed image.
Note: Very useful when using polygon match refinement where the polygon
use a wider area than the first step cross-correlation
View partial only - this temporarily zooms the viewed image to
show the partial template defined above
Use subimage - enable a second pattern matcher on a separate ROI
inside the template. Use for instance to distinguish between object that are
nearly the same, except in a small region
Threshold - threshold used for the second pattern matcher
Inv - if unchecked, a match in the subimage is required for this
template to generate a match; if checked, no match in the subimage is
required
Center-X, Center-Y - defines the template center. Can also be set
by clicking in the image
Get center of gravity / From polygon - Sets the Center-X and
Center-Y values to the center-of-gravity of the selected polygon. Useful to
locate the center of a circle for example, and much more accurate than
manually clicking.
Angle - define the angle of the template in degrees - used to
handle templates with different angles in multitemplate systems
Name - user defined name of the template - useful in
classification when having multiple templates
Mouse partial template or subimage operation (when selected):
- Alt + Mouse movement to find rectangle or corner (cursor changes)
- Alt + Left drag to move corner or rectangle
Resampling
Resampled image size - tf3 always resamples the
picture within the ROI, correcting for any perspective and lens calibration.
This can also be used as a kind of decimation in the picture,
improving the speed of the pattern matcher.
-
Image size (percent of dX and dY) - sets the size (in
pixels) as a percentage of the search area size (in reference coordinates) -
the resulting image size is shown when performing resampling.
-
Resampled image pixel size (approx) - choose this
setting instead to retain the pixel size as far as possible. E.g. use 1 to
have the resampled image consist of the same number of pixels as the
original (within the ROI). If you use 2, the number of pixels in the
resampled image will be halved in both directions. The resulting image size
is currently not precomputed for this setting.
Acquire resampled picture - copy the last
inspected image into image window
Copy selection to clipboard - copy the shown (possibly zoomed)
image to the clipboard. This is the preferred method when populating
templates. Switch to the Setup/Templates tab and paste the image there.
Note: original to resampled pixel ratio give an approximate value
for the decimation ratio - use to verify when working with complex reference
systems.

Advanced
Template
Decimation - When active the template and image is decimated before
matching. This speeds up the tool when the templates get big. The decimated
size of a template should be at least 10 by 10 pixels.
Note: Image decimation leads to lower score
values - a decimation factor of up to 5 or so will normally just speed up the template
matcher - higher values can degrade detection capabilities. Be aware - the
effect depends on your application and the images - it has to be
investigated in each case.
Automatic settings - Calculate the decimation
factor automatically based on the templates
The decimation will inevitably lead to inaccurate
positioning of the matches. A second, non-decimated rematch is always
performed in the vicinity of each candidate, improving accuracy and possibly
eliminating false matches.
Rematch area size (percent) - the size of the rematch area is set as a percentage of the
decimation factor. A low percentage speeds up the rematch, but matches may
be missed. 100% means an area of +/- Factor pixels horizontally and
vertically.
Template modification - use modified templates:
Include in match description - specify the
description visualisation string
-
Result order - see Sort results by
-
Score - see Score calculation
-
Subscore - Subimage score
-
Template number - numbered from 1
-
Template name - user defined template name
-
Position - x,y in result coordinates
-
Angle - in result coordinates
-
Size - percent of template size
-
Scale - percent of template size, split into x and
y results (may differ if polygon match is active)
-
Polygon match % - percent of polygon points that
matched
Sort results by
-
Score - calculated as per the score calculation
percentage
-
Strictly by X position - X position only
-
Strictly by Y position - Y position only
-
Grid: X, then Y position - cluster positions
into rows and columns, order as rows
-
Grid: Y, then X position - cluster positions
into rows and columns, order as columns
-
Ascending X - smallest value first
-
Ascending Y - smallest value first
-
Grid threshold X
-
Grid threshold Y - used to cluster
positions into rows and columns (in result coordinates)
Result strings
Result modification
-
Negate angles - change sign of all angle results
-
Add to angle results - fixed angle offset, all
angle results
-
Angle results start at - resolves angle ambiguity.
If set to -180, angle results are [-180,180); if set to 0, results are
in [0,360).
Include in outgoing reference system - the
outgoing reference system is a reference to the first match (defined with
Sort results by).
-
Translation - match position
-
Rotation - match rotation
-
Scale - match scale
-
Skew/perspective - complete transformation from the
polygon match
-
Individual template angle - outgoing reference
reflects template angle (Note: this setting is only available for
older profiles - for newer profiles this is always on)

Statistics
Template Match statistics are collected on this page to
help evaluate template effiency in multiple template systems.

Polygons
Each template can have a set of polygons attached, to
refine the match to a subpixel level. The polygons are drawn on the template
image.
Closed polygons - default polygon behaviour.
Closed
means the beginning and end are connected
Template active - (de)activate template. Same as
the Active checkbox under Setup/Templates.
Polygon fit active - (de)activate
polygon match per template
Polygon Editor
- Numbered list ("Vector") - ordered list of polygons. Each polygon can be
made active/inactive by clicking the checkbox in front of the number
- Contents - the points of the selected polygon
- New - add polygon
- Delete - remove selected polygon
-
Paste new - creates a new polygon, pastes the polygon from the
clipboard and presses apply - this is the quickest way to create
many polygons
- Highlight selection - highlights the selected polygon in the
image
- used to identify a polygon in the image
- Copy - copies the selected polygon to the clipboard
- Move - enabled when one or two points are clicked onto the
clipboard. Will move and optionally rotate the selected polygon.
Rotation is done when two points are on clipboard, and the first two
points in the polygon will be aligned with this.
- Paste - pastes the clipboard to the selected polygon - will
overwrite an existing polygon
- Copy can be used to transfer polygon to the image for editing and
modification. The edited polygon is pasted back to the tool using
Paste. More on Point and Click Operations
Additional "Vector" Right-click menu
- Custom...
- set individual traceline settings. This will be indicated by the
number in red -
very useful when working with multiple polygons to locate different
types of edges.
- Set defaults
- remove custom settings
- Up
- move vector up in list
- Down
- move vector down in list
- Grid
- add a regular grid of rectangles to polygon list
- Delete all
- remove all polygons
- Delete empty vectors
- remove empty (and useless) polygons

Autofit - Polygon Model Wizard
-
Autofit - when active will Scorpion try
locate edge in between the points the user defines. The traceline
setting is taken for the selected polygon in the polygon editor except
for the separate settings below,
-
Step length
-
Trace start
-
Trace stop
-
Visualize will show actual tracelines while making
the model.
Note 1: Polygon fit will only work when traceline
settings are right for detecting the edges in the actual template.
Note 2: Use the traceline viewer to optimize traceline settings
The picture shows the located valve - the cyan markers
are the fitted points - the blue line is the original model - the distance
between the fitted points and the blue model shows how polygon match
corrects the angle and position of the valve. With polygon match the valve
is located with sub-pixel accuracy.

It is imperative to try to use the Polygon Model Wizard because the model
made with the wizard is superior in many cases.
Tracelines
For the polygon match tracelines are defined,
perpendicular to the polygon. Edges found along these tracelines are then
used to find the optimal polygon match.
Note: similar settings are also available per
traceline on the Setup/Polygons tab.
Tracelines
-
Use trace line count - specify number of tracelines
per polygon
-
Count - number of trace lines
-
Step length (pixels) - compute trace line count by placing
the lines apart by this distance
-
Start point (pixels) - distance from polygon
-
End point (pixels) - distance from polygon
-
Trace step (pixels) - sample distance
-
Line width (pixels) - how many extra trace lines on each
side (at distance 1 pixel)
-
Use pixel size from original image (not
resampled) - when selected, the traceline settings refer to the
pixels in the main (original) image. Otherwise the resampled pixel size
will be used.
Edge detection
-
Smooth base - filter length
-
Smooth counter - filter repetitions
-
Differentiation - number of times to differentiate
samples
-
Percent threshold
-
If unchecked, the threshold used is the fixed
one in the Threshold edit field.
-
If checked, the threshold used for each trace
line is computed as a percentage of the current max value, but never
below the Min threshold value.
-
Threshold/Min threshold - see line above
-
Polarity - which edge to search for
-
Mode - edge detection
-
Edge choice - which edge to retain when multiple
are found for a trace line
Trace line samples dialog
A graph of sample values for selected tracelines. Only
samples from the best match template are shown. Choose which line(s)
are shown using
-
Middle/Middle+edges/Selection - select tracelines
in polygon
- Line indices - traceline selection
- example: 2,3,12-15
- example: 1 3 5 7
-
Polygon number - select which polygon
-
Show trace line popup - display dialog


Polygon Match
Polygon match
-
Parameters to adjust - degrees of freedom in
polygon match algorithm
-
Translation, rotation - default
-
Translation, scale
-
Translation, rotation, scale, skew
-
Max repeat count - max number of times to reapply match
-
Omit further iterations if fit % exceeds -
match is considered good enough - process no further
-
Abort if fit % is less than - discard last
iteration and process no further
-
Abort if fit % deteriorates - discard last
iteration and process no further
-
Abort if fit RMS deteriorates - discard last
iteration and process no further
-
Keep best points (%) - disregard "worst case" points in
polygon fit
-
Perform final fit with distance constraints -
additional cycle, using only points closer than
Hint: To learn the
PolygonMatch concept one can Study the PolygonMatch tool.
Result acceptance (constraints)
-
Min match percentage - disregard match if fewer
points were fitted
-
Max match RMS - disregard match if RMS is
larger
-
Max total angle correction - disregard match if too
much movement
-
Max total distance correction - disregard match if
too much movement
-
Max total offset X correction - disregard match if
too much movement
-
Max total offset Y correction - disregard match if
too much movement
Template match validation

|