When we invented the The Data Input page
concept we did understand how important this was for Scorpion Vision.
The basic idea was to replace the need for custom html or .Net pages
that is easy to embed in the Scorpion Application. It is used in almost
all Scorpion Vision Systems.
The main purpose is to let the profile builder to quickly expose
selected parameters to be configured by the operator or the user of the
Scorpion Vision profile - it is easy and extremely powerful feature.
With data input concept the pages are built on site and often maintained
by the operator. This means that they are up to date and defined by the
people using it.
An input page consists of named groups or
sections. In
each group a list of editable parameters is contained.
A group or an item can be copied between pages and profiles.
The Data Input concept is also added to the generic
BaseTool for creation custom user tool and the ToolBox. This means that
the user interface is moved out into the tool where it really belongs.
In this way it is possible to copy the tool including the data input gui
between profiles.Below an input
page is added to the Settings tab - password protected with the operator
password.
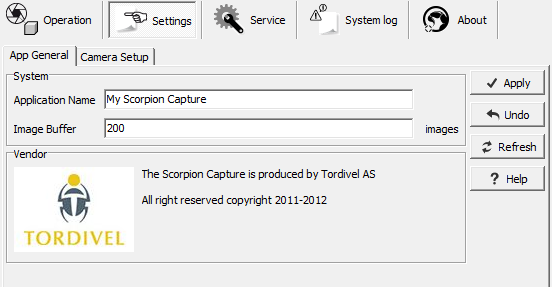
The System group is defined by the profile
builder.
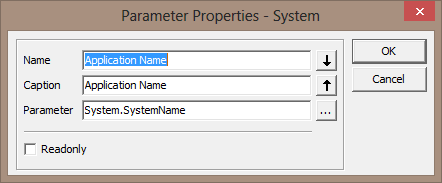
- The Application Name is
connected to a System value in the tag database.
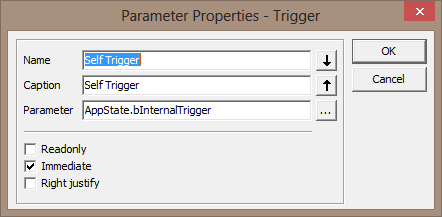
The Application Name system properties show a
Name, a Caption and Parameter. It is possible to configure multiple
languages in a Data Input Page - the Caption be language specific. By
linking the System.SystemName means that the user has Read/Write access
to this value when editing the Application Name in the Data Input Page.
It is possible to mark a value read only.
- The Image Buffer is connected to
a value in the Toolbox.
- The precision and
the unit is defined in the result tab of the actual tool.
- Most often
results/settings from Data tools are mapped in the Data Input page.
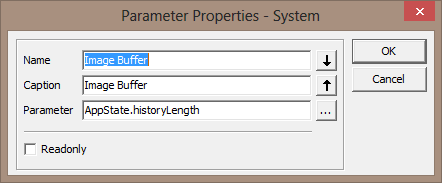
The Image Buffer is linked to
AppState.historyLength parameter. The browse ... button will activate
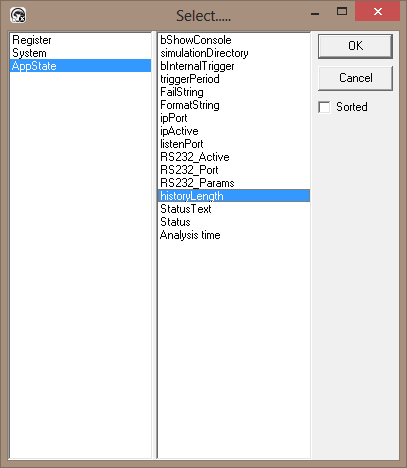
tag selector.
The Tag Browser contains all values / tags that
can be linked to the data input page field Image Buffer.
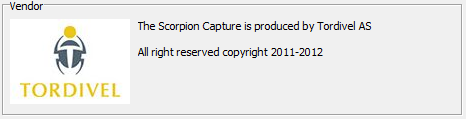
Information Group
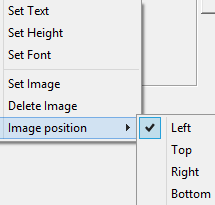 The
Vendor section show a decoration. The decoration has the following
properties The
Vendor section show a decoration. The decoration has the following
properties
- Text
- Height
- Font
- Image
- Image Position :
Left | Top | Right | Bottom
Options Group
The option Self Trigger field is connected to the
AppState.bInternalTrigger. The Period is connected to the
AppState.triggerPeriod and the Live Video is connected directly
System.Live Video.
Note: By activating the
Option.Immediate property clicking on the slide button will toggle on /
off live video directly.
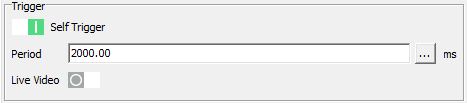
The Option.Right is normally when the option
activates / deactivate a set of values when set ON. If the option is
only reflecting itself the option can be set ON like with the Live Video
that is Right justified.
The Readonly property will disable user access to
change or set the value.
Data Input Operations
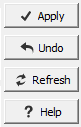 The following operations are available: The following operations are available:
- Apply - will submit the values of the input page to the toolbox
- Undo - will undo changes not submitted to the toolbox
- Refresh - will update the value of the page
- Help - will activate this page
Note: If the value of the Data Input page is changed from
somewhere else than the Data Input the user needs to press Refresh to
get the current values.
Configuring the Input Page
In Service mode a mouse menu will be available with right-clicking
the mouse. The mouse menu is position sensitive. Position the mouse on
top of the object you want to edit or where you want to create a new
group or new parameter.
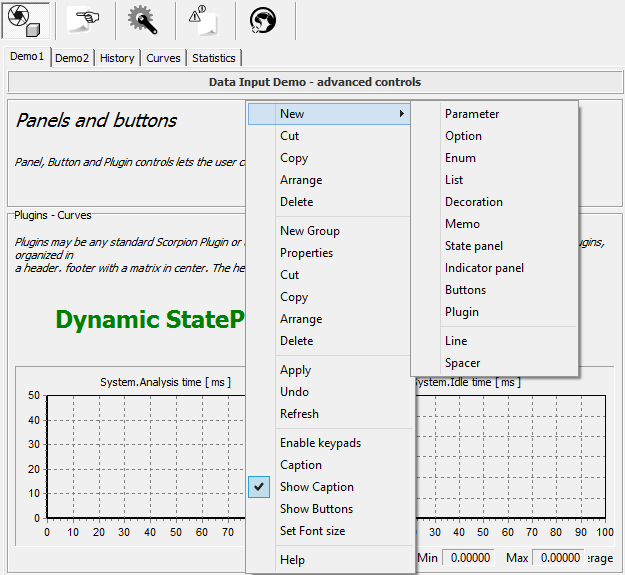
- New - creates a new item of the following
types in the position given by the mouse position
- Parameter
- Option
- Enum
- List
- Decoration
- Memo
- State panel
- Indicator panel
- Buttons
- Plugin
- Line
- Space
- Cut
- Copy
- Arrange - activates the item sorting dialog
- Delete - activates a delete item dialog
- New Group
- Properties
- Cut
- Copy
- Arrange - activates the group sorting dialog
- Delete - deletes a group
- Apply
- Undo
- Refresh
- Enable keypads
- Caption - set caption
- Show Caption - toggle caption on / off
- Show Buttons - show / hide operation buttons
- Set font size
- Help - activates this page
Hint: A group
must be created before an item can be added.
Example 1:
Convert UniCode to Norwegian Characters
def unicodeToNOR(strval):
s=strval
s=s.replace('\\xc6','Æ')
s=s.replace('\\xd8','Ø')
s=s.replace('\\xc5','Å')
s=s.replace('\\xe6','æ')
s=s.replace('\\xf8','ø')
s=s.replace('\\xe5','å')
return s
c=GetStringValue('Setup.Customer')
p=GetStringValue('Setup.Product')
product='%s.%s'%(c,p)
products=eval(GetStringValue("Product.Dictionary"))
if not product in products:
products[product]=len(products)
SetStringValue('Product.Dictionary',unicodeToNOR(str(products)))
SetStringValue('Product.Value',product)Hint: Data Input Values are zeroed after Scorpion restart
If the data values are connected to a
data tool - verify
that the
option
- Make
external changes permanent -
Activating this
value will make the values persistent
is activated.
|
