|
Scorpion Vision Software supports firewire Flea2 cameras from Point Grey
Research Inc. using the
- PtGreyCamera.dll - Scorpion Camera Driver
Prerequisites
- Scorpion Vision Software version 7 or higher
- FlyCapture driver package installed. Supported version
2.0.1.6
- Cameras are configured and detected by FlyCap2
- Important: Image format must be set to Format7
Installation
- If Unibrain driver installed, uninstall it:
- Go in to "Control Panel"
- Double-click "Add or Remove Programs"
- Select "ubCorePro" and then click "Change/Remove"
- Install FlyCapture 2.0:
- Start FlyCapture2 install
- In Welcome screen click "Next"
- In "FlyCapture Software License Agreement" screen click "Next"
- In "Release Notes" screen click "Next"
- Fill in User Information and click "Next"
- In "Destination Folder" screen click "Next"
- In "Select Installation Type" screen select "Complete" and click
"Next"
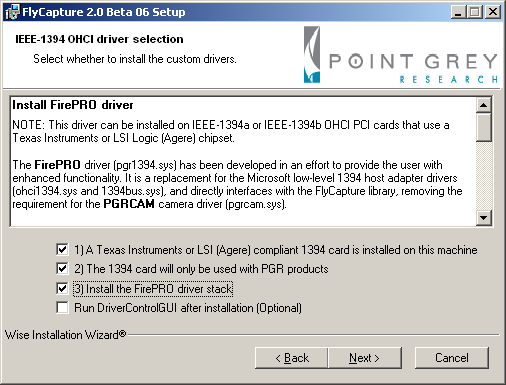
- In "IEEE-1394 OHCI driver selection" screen select 1), 2), 3) checkboxes and click
"Next"
- In "Enhanced Halt State Disable" screen click "Next"
- In "Ready to Install the Application" screen click "Next"
- IIn "View PGR FlyCapture Documents" screen click "Next"
- Click "Finish"
- Add FlyCapture 2.0 to the "Path" environment variable:
- Go in to "Control Panel"
- Double-click "System"
- Choose "Advanced" tab
- Click "Environment Variables"
- In "System variables" select "Path" and then click "Edit"
- Append path ";C:\Program Files\Point Grey Research\FlyCapture2\bin"/li>
- CClick "OK" three times
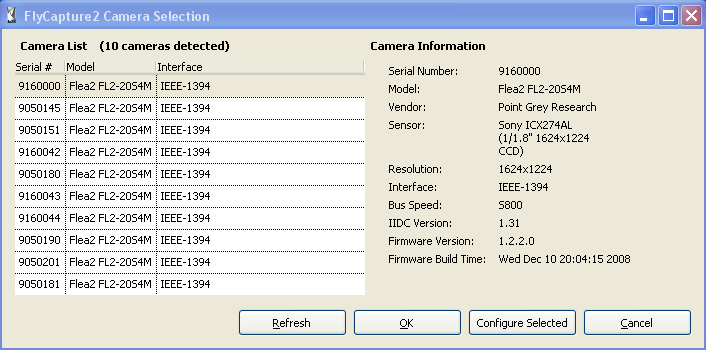
- Check that Bus Speed is S800:
- Start FlyCap2 utility
- Select camera
- Check that displayed Bus Speed is S800. If not, consult PtGrey Knowledge Base
Article 171
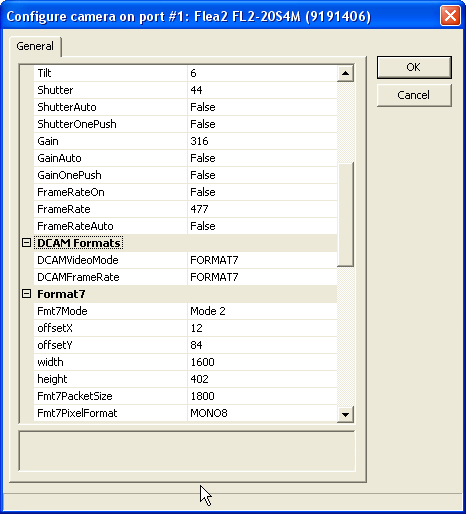
- Check that image format set to Format7
- Copy PtGreyCamera.dll to the Scorpion installation folder.
- Set up "continuous" mode:
- In Central add script:
def SetContinuous(on):
  cameras = GetCameras()
  for i in range(cameras.count):
    cam = cameras.getCamera(i)
    cam.setProperty('continuous', on)
- In Actions to the "BeforeStart" event add script command "SetContinuous(1)"
- In Actions to the "AfterStop" event add script command "SetContinuous(0)"
Note: Performance of 1394 devices may decrease after installing Windows XP SP2 or SP3. See PtGrey Knowledge Base
Article 171.
Property page
- General
-
Log level
- Level 0 suppresses all messages.
- Level 1 issues error and warning messages.
- Levels 2,3,4 issue diagnostic messages.
- Beware that level 4 produces
a lot of messages therefore should be used only on small size images
for diagnostic purposes only.
-
Also log into file
- Write camera related messages into log file.
- Normally messages are
written only on Scorpion console, provided console is enabled for
camera messages.
- Camera Settings
- Continuous
Open camera in continuous mode. Image grabbing will be started after Scorpion start-up and camera reset.
- Brightness
Sets the level of black in an image.
- AutoExposureOn
Auto exposure (AE) allows the camera to automatically control shutter and/or gain
in order to achieve a specific average image intensity.
- False - control of the exposure is achieved via setting shutter and/or gain.
- True - the camera automatically modifies shutter and/or gain to try and match
the average image intensity to one-quarter of the specified AE value.
If only one of shutter and gain is in auto mode, the auto exposure controller attempts to control
the image intensity using that one parameter. If both of these parameters are in auto mode, the
auto exposure controller uses a shutter-before-gain heuristic to try and maximize the signal-to-
noise ratio by favoring a longer shutter time over a larger gain value.
- AutoExposure
Sets the AE value.
- AutorExposureAuto
The camera modifies the AE value in order to produce an image that is
visually pleasing.
- Sharpness
For sharpness values greater than 1000, the pixel is sharpened; for values less than 1000 it is blurred.
- SharpnessAuto
When sharpness is in auto mode, if gain is low, then a small amount of sharpening is applied,
which increases as gain decreases. If the gain is high, a small amount of blur is applied,
increasing as gain increases.
- Hue
Control the Hue component of the images.
- Saturation
Control the Saturation component of the images.
- Gamma
This value provides a mechanism to control the function used to non-linearly map
a higher bit depth image produced by the sensor to the requested number of bits.
- Shutter
Control of the CCD shutter time.
- ShutterAuto
The shutter value is set by the auto exposure controller.
- ShutterOnePush
The shutter value controlled automatically by the camera only once.
- Gain
Controls the gain of the A/D converter.
- GainAuto
The gain value is set by the auto exposure controller.
- GainOnePush
The gain controlled automatically by the camera only once.
- DCAM Formats
- DCAMVideoMode
Video mode.
- DCAMFRameRate
Frame rate value.
- Format7
- Fmt7Mode
Mode_0, Mode_1, Mode_2 and Mode_3 are region of interest (sub-window) modes
that allow the user to only transmit a selected area of the image.
Mode_1 and Mode_2 are also pixel binning (subsampling) modes.
- offsetX
This value sets the X offset (left offset) for the area of interest in pixels.
- offsetY
This value sets the Y offset (top offset) for the area of interest in pixels.
- width
This value sets the width of the area of interest in pixels.
- height
This value sets the height of the area of interest in pixels.
- Fmt7PacketSize
This value determines the real packet size.
- Fmt7PixelFormat
The encoding scheme by which color or grayscale images are produced from
raw image data.
- Storbe/Trigger
- StrobeOnX
If enabled, the pin X will output a pulse each time the camera begins
integration of an image.
- StrobeDelayX
This value sets strobe delay.
- StrobeDurationX
This value sets strobe duration. Setting a strobe duration value of zero
will produce a strobe pulse indicating the exposure (shutter) time.
- GPIODirectionX
Configures pin X to be either input or output.
- TriggerOn
Enable external trigger.
- TriggerSource
Selects source for the trigger.
- TriggerMode
- 0 - the camera starts integration of the incoming light from external trigger
input falling/rising edge.
- 1 - the camera starts integration of the incoming light from external trigger input
falling edge.
- 3 - allows the user to put the camera into a mode where the camera only transmits
one out of N specified images.
- 4 - allows the user to set the number of triggered images to be exposed before the
image readout starts.
- 5 - allows the user to set the number of triggered images to be exposed before the
image readout starts.
- 14 - is a vendor-unique trigger mode that is very similar to Trigger_Mode_0, but
allows for triggering at faster frame rates. This mode works well for users who want
to drive exposure start with an external event. However, users who need a precise
exposure start should use Trigger_Mode_0.
- 15 - is a vendor-unique trigger mode that allows the user to fire a single hardware
or software trigger and have the camera acquire and stream a predetermined number of images
at the current frame rate.
- TriggerParameter
Specifies the value N when required by trigger mode. See above.
- TriggerDelay
Controls the delay between the trigger event and the start of integration.
Properties available from Python
The following named properties can be dynamically accessed with
the 'SetProperty' and 'GetProperty' commands:
- 'continuous'
- Enter or leave continuous grabbing mode.
- The continuous mode is normally set when using the command in
hw-trigger. Setting continuous modes removes the need for arming the
camera with a Grab command.
- 'AutoExposure'
- 'Shutter'
- 'Reset'
- Close and ReOpen the camera.
Example 1: Start Continuous grabbing
SetProperty('continuous', 1)
Example 2: Stop Continuous grabbing
SetProperty('continuous', 0)
Example 3: Reset camera
SetProperty('Reset', 1) Example
4: Set Shutter
SetProperty('Shutter',66) |
