|
Scorpion Vision Software supports the complete range of Prosilica
GigE cameras using the
- PVGrab.dll - Scorpion Camera Driver, standard
mode
- PVGrabNoBroadcast.dll - Scorpion Camera Driver,
initializes in no-broadcast mode only
- PVAPI.dll - Prosilica API dll
Note: please specify cameras by their IP addresses when
using PVGrabNoBroadcast.dll
Standard or No Broadcast mode driver - which one to choose
PVGrab.dll initializes in standard Prosilica API mode. In standard mode
broadcast messages are sent periodically over the network in order to
discover new cameras. The advantage for the user is that in Scorpion
there is a list of camera names presented the user can choose from.
However if broadcast messages are annoying the user can choose
PVGrabNoBroadcast.dll, which does not send any broadcast messages. As a
consequence, Scorpion cannot present camera list, so the user has to specify
cameras by their IP addresses in the camera name field.
Otherwise the two drivers are identical.
It must be noted, that IP addresses (instead of camera names) can be used
with PVGrab.dll as well.
Installing Scorpion camera driver
Scorpion driver PVGrab.dll
or PVGrabNoBroadcast.dll
require Prosilica API
library PVAPI.dll. Normally they are installed when installing Scorpion. However if
you require the latest drivers please make sure both
Scorpion driver and Prosilica's PVAPI.dll are copied into Scorpion folder. See
Release Notes for download links.
Important:
When switching between PVGrab.dll
and PVGrabNoBroadcast.dll
please remove first all cameras from Scorpion camera list and restart
Scorpion. After that you can add cameras and select the other driver. You may need
to recreate image which is removed along with camera removal. If you use
more than one Prosilica camera in Scorpion profile, only one type of
Scorpion Prosilica drivers can be used in the same profile.
For camera installation see the Prosilica documentation.
More information about Prosilica -
http://www.prosilica.com/
More information about ethernet -
http://computer.howstuffworks.com/ethernet.htm/printable>
Setting the Prosilica Camera driver
- ActActivate the Service.Camera tab
- R-mouse click the Camera Settings menu
- Select Cameradriver
- Select the PVGrab.dlli>

Recommended Network Configuration
When using GigE for machine vision it is recommended to use a separate
network card as a "frame-grabber".
If there is more than one NIC on the host computer, then you must make sure that the camera and the NIC associated with that camera are on the same subnet.
By using the subnet mask 255.255.255.0, then the host computer and the camera know that they are talking on the same subnet.
If you do not mask the subnet (ie. if you use
255.255.0.0), then camera does not know which network it is talking on and
commands get lost. Be sure to review the following FAQ:
http://www.prosilica.com/support/gige/multiple_network_cards.html
The following is true about the gigE cameras:
- The camera should answer a ping.
- If the camera is on a different subnet, it will
not hear the ping, and so will not answer.
- In order for the Prosilica Viewer to see a
camera, the camera and the NIC must talk on the same subnet and the
subnet mask must be set properly too.
- The Viewer only sees cameras that are on the
local subnet. The GigEIPConfig utility sees beyond the subnet and
will list every camera on the local network without regard to subnet.
- Use the GigEIPConfig program to manage /
configure the ip-address of a connected camera
- Use the Prosilica to test a configured and
connected camera
Prosilica GigE Property Pages
Below are the property pages explained.
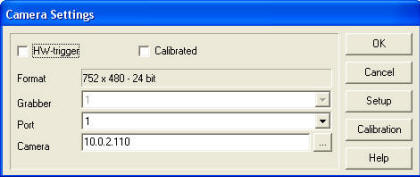
The camera setup dialog allows the user to set the most common properties
of the camera. To access other properties use the Scorpion commands
described in the
command section or by the
python camera
interface
Camera visibility
Prosilica cameras are visible to the driver only if they are connected to
the same subnet as the computer and they are not blocked by the computer
firewall. Normally cameras can be selected using the ... browse
button.
Note: To access cameras on different subnets you can type the ip-address
- 192.0.0.1 -
in the Camera field of the Camera Settings dialog - see below.
General page
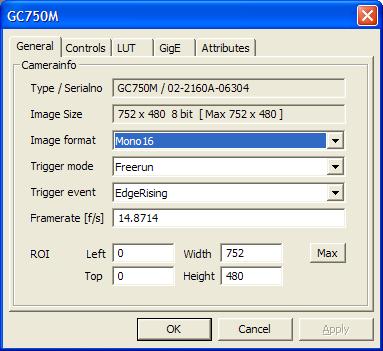
Image format
- Supported formats
- Mono8
- Bayer8
- Rgb24
- Y411
- Y422
- Y444
Trigger mode
- Freerun - continuous video stream. This option reduces the acquisition
time but increases the Ethernet load.
- SyncIn1..4 - hardware triggered. Triggered due to the Trigger
event settings
- FixedRate - acquires images at a fixed rate set by the frame rate
value
- Software - a trigger command is sent to the camera for each image
request. This option reduces the Ethernet load to a minimum but
increases the acquisition time.
Note: Freerun is a fast streaming mode using bandwidth continously -
Software is slower but uses less bandwidth
Trigger Event
- Applies to Trigger mode SyncIn1..4 only. See actual camera
documentation for event settings.
Framerate
- Applies to Trigger mode FixedRate only.
- Defines number of frames per second (fps)
- The framerate maximum depends of physical Ethernet capacity, GigE
settings and image size.
Controls page
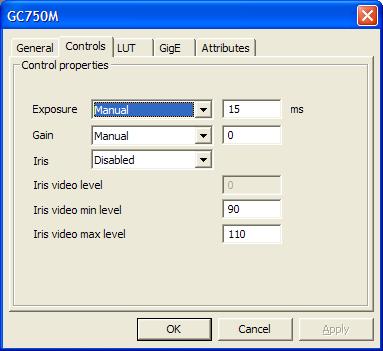
Sets the most common controls for the camera. See the camera specification
for actual camera for further information.
LUT page
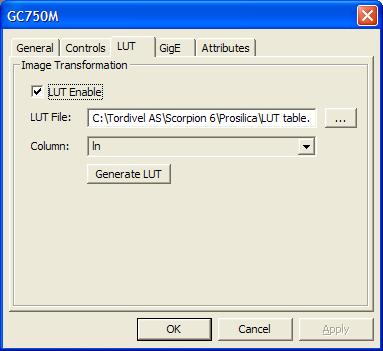
Apply lookup table. Lookup table must follow some rules, see example.
LUT File
- The File Name of LUT file.
Column
- In drop down list choose column to
use.
Generate LUT
- Logarithmic LUT generation.
GigE page
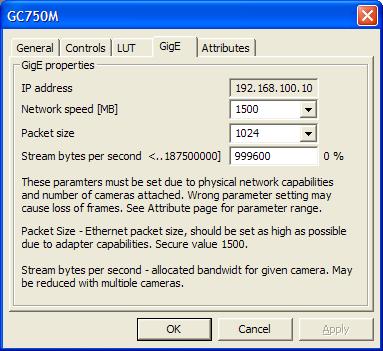
PacketSize
- This parameter determines the Ethernet packet size. Generally
speaking this number should be set to as large as the network adaptor
will allow. If this number is reduced, then CPU loading will increase.
These large packet sizes are called Jumbo Packets in Ethernet
terminology. If your Gigabit Ethernet - 1000baseT network adaptor does not support
Jumbo Packets of at least 9 Kbytes, then you will need to reduce
PacketSize parameter of the camera to match the maximum Jumbo packet
size supported by your Gigabit Ethernet inteface. The default value for
GigE is 8332.
Note: Use 1500 as packetsize for fast ethernet -
100baseT
StreamBytesPerSecond
- This control is very useful. This control can be used to moderate
the data rate of the camera. This is particularly useful for slowing the
camera down so that it can operate over slower links such as Fast
Ethernet - 100 MBit or wireless networks. It is also an important
control for multicamera situations. When multiple cameras are connected
to a single Gigabit Ethernet port (usually through a switch),
StreamBytesPerSecond for each camera needs to be set to a value so that
the sum of each cameras StreamBytesPerSecond parameter does not exceed
the data rate of the GigE port.
Note: Setting this number to 994952 = 8 MBit is good for
100baseT. On 1000baseT a value corresponding to 80 MBit is a conservative
value. One byte is 8 bits. The practical capacity on a 100BaseT is 60 - 80
MBit.
Attributes page
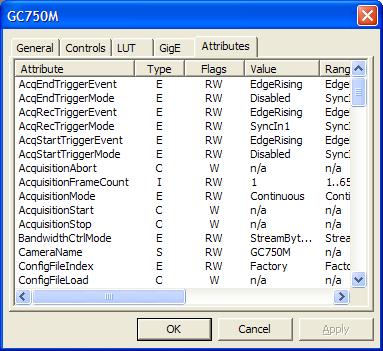
The Attribute page lists all available camera properties
- Attribute - attribute name, this is the name to be used in get/set
property commands
- Type
- C - command
- E - enumeration
- S - string
- I - integer
- F - float
- Flags
- R - readable
- W - writable
- C - constant
- V - volatile (camera controlled value)
- Value - current value
- Range - attribute range
- Category - the attribute category
For detailed attribute information see
http://www.prosilica.com
Example 1: Settings white balance from Central script
def SetWhiteBalance(red,blue):
  cam=GetCamera("0") #equals cam=GetCameras().getCamera(0)
  cam.setProperty('WhitebalValueRed',red)
  cam.setProperty('WhitebalValueRed',blue)

  #verify set ok
  print 'red',red,cam.getProperty('WhitebalValueRed')
  print 'blue',blue,cam.getProperty('WhitebalValueBlue')
|
