|
Scorpion Vision Software
provides framework to quickly and easily create complete and
advanced machine vision inspection systems.
The Scorpion Vision
Software provides simple user interface for creating a new machine
vision inspection system, by specifying the configuration for
various elements like -
(a) camera to be used,
(b) frequency of image capture,
(c) inspection process for every captured image - which is called as
an inspection cycle,
(d) possible output states from every inspection cycle,
(e) handling of the output result from an inspection cycle,
(f) communication with external systems or softwares for receiving
the signal inputs and for sending the output results.
The Scorpion Vision Software also provides support for adding custom
steps, using Python script.
All these configurations for a machine vision inspection system
can be saved in form of a 'profile'. A profile can hence be
considered as a data file which contains all the required
configurations for a machine vision inspection system, created using
the Scorpion Vision Software.
The Scorpion Vision Software provides simple user interface to
(a) save a profile after doing configuration changes,
(b) load a previously saved profile,
(c) back-up a profile,
(d) restore a previously backed-up profile
It is also possible copy a saved profile from one computer to other
computer.
The Scorpion Vision Software can manage multiple profiles, hence
can manage multiple machine
vision inspection systems, independently.
The Scorpion Vision Software provides an intuitive wizard which
assists in creating a new profile. Following are the steps to create
a new profile using the wizard.
1. Launch the Scorpion Vision Software, from the programs menu
link 'Start->All Programs->Tordivel Vision Solutions->Scorpion
8.5->Scorpion 8.5. This will pop up the profiles management dialog
box.
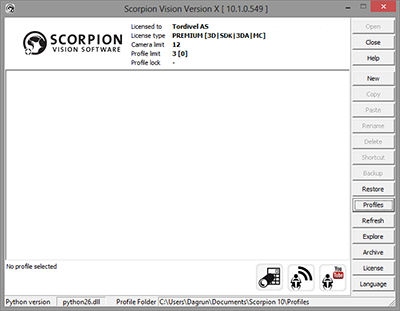
It lists all the previously saved profiles. The list may be empty if
there are no profiles saved previously
2. Click on the 'Menu' and click on the
'New' sub-menu available under it. This will pop up the
'Create profile' dialog box.
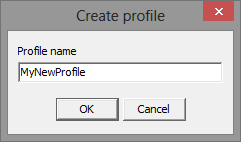
3. Please type the 'Profile name' as 'MyNewProfile'.
You can use any other name such that it will be useful in
identifying the profile later.
4. Click on the 'OK' button to set the name for
the new profile and to launch the 'Scorpion profile setup'
wizard.
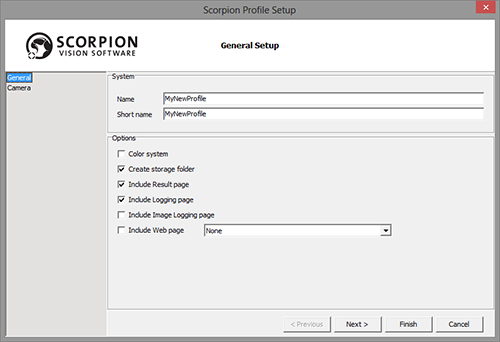
[i] Please click on the 'Finish' button anytime to
create the new profile with the selected configuration. Good default
parameters are set for all configurations, in the wizard, so it is
possible to click on the 'Finish' button anytime, to create a new
profile.
[ii] To cancel creation of the new profile, please click on the
'Cancel' button.
[iii] It is possible to switch between the wizard pages using the
'<Previous' and 'Next>' buttons,
or by clicking on the links available in the left navigation pane.
The wizard assists user in quick set up. All configuration
parameters set from the new profile wizard can be changed later from
the Scorpion Vision Software user interface, when the profile is
loaded in it.
5. 'General Setup' is the first page displayed
in the wizard.
[i] The 'Name' text box under the 'System'
group, can be used to change the name or identifier of the system
[ii] The 'Short name' text box, can be used to
change the short name of the system
[iii] The 'Color system' checkbox under the
'Options' group, can be used to specify whether the new
profile will work on color images or on grayscale images. Please
enable 'Color system' check-box, if any of the color based tools is
expected to be used during the profile configuration.
[iv] The 'Include Result page' checkbox can be
enabled to add the 'Results' tab under the 'Operation' mode, when
the profile is loaded in the Scorpion Vision Software
[v] The 'Web page' checkbox can be enabled to add
the 'Web Browser' tab under the 'Operation' mode, when the profile
is loaded in the Scorpion Vision Software. The drop down box
available next to the 'Web page' check box can be used to specify
the web page to be displayed in the 'Web Browser' tab under the
'Operation' mode. This web page is displayed when the 'Web Browser'
tab is enabled and displayed in the Scorpion Vision Software user
interface.
Click on the 'Next' button to move to the next
'Camera Setup' page in the wizard. Alternatively, click on the
'Camera' link available in the left navigation pane to switch to the
'Camera Setup' page in the wizard.
6. 'Camera Setup' is the next page displayed in
the wizard.
[i] The 'Camera driver' dropdown, under the
'Cameras and Images' group, can be used to specify the
video capture driver DLL. The dropdown box lists all the standard
driver DLLs available along with the Scorpion Vision Software. A
different driver DLL can be selected by clicking on the
'Select driver' button available next to the 'Camera
driver' dropdown. This will pop up the standard 'File Open'
dialog box. It is possible to navigate to and select any driver DLL
from this standard 'File Open' dialog box.
The selected driver DLL file is used for all cameras configured
using the wizard
[ii] The 'show driver properties' button available
next to the 'Select driver' button, can be used to view the
properties of the selected driver DLL file.
[iii] The 'Number of cameras' text box can be used
to specify the number of cameras used by the profile. The standard
'^' and 'v' buttons next to the
text box can be used to increase of decrease the number of cameras
by 1.
[iv] The 'Number of images' text box can be used to
specify the number of images used by the profile. The standard
'^' and 'v' buttons next to the
text box can be used to increase of decrease the number of images by
1.
[v] The 'Run cameras in continuous mode' checkbox
can be enabled for continuous mode operation during video capture.
This configuration is valid only for hardware triggered cameras
[vi] The 'Run in simulation mode' checkbox can be
enabled to override the camera driver settings and to use simulation
images.
[vii] The 'Import images' checkbox can be enabled
to specify path for importing the simulation images. When the
'Import images' is enabled, the user interface for specifying the
simulation images is enabled. The images from the specified folder
are copied or moved to the profile path and are then used by the
profile for simulating the video input
[viii] The radio buttons can be used to specify the mode for
importing the simulation images - 'Copy files to profile
folder' copies the images from the specified import folder,
keeping the images in the original import folder unchanged and
'Move files to profile folder' moves the files to
the profile folder, hence the images in the original import folder
are deleted.
[ix] The 'Import from' text box can be used to
specify the path of the folder which contains the simulation images.
[x] It is possible to navigate to and select the folder from the
standard windows 'Folder selection' dialog box, by clicking on the
'Select folder' button. The number of valid images
available for import are displayed below the 'Import from' text box.
[xi] The 'browse' button available next to the
'select folder' button; can be used to browse the
folder selected for importing the images.
[xii] The 'show folder content' button available
under the 'browse' button, can be clicked to see the files available
in the folder selected for importing the images.
7. After the configuration is done, click on the 'Finish'
button to create the new profile and to close the wizard. The
Scorpion Vision Software is automatically launched with the new
profile loaded in it.
|
