Color images are normally acquired in RGB format. This format is most
efficient for display of colors. For image processing applications the
HSI is a better choice. The HSI color model represents every color
with three components: hue (H), saturation (S), intensity (I). The figure below
illustrates how the HSI color space represents colors.
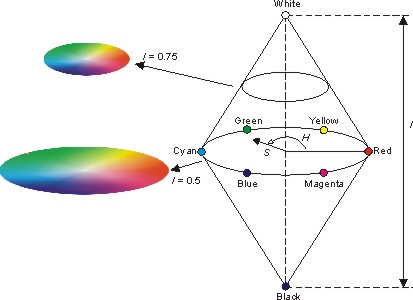
The H value identifies the color and is normally represented with an
angle [0..360]. The S value is normalized to [0..1] and describes
how far away from the grayscale the color is. A value of 1.0 is said
to identify a pure color. The I value describes the amount of white
present in the color. A value of 0.5 gives the colors that are the
purest - that is the distance from the grayscale is at its maximum. An
S value of 0.0 gives the grayscale leaving the H value meaningless. S=0 and
I=0 is black. S=0 and I=1 is white. The ColorSegmentor tool does not
represent HSI values as [0..360], [0..1], [0..1]. Instead the values
are represented using discrete
8 bit values [0..255], [0..255], [0..255]. The H value is placed with
0 at Red as in the HSI model. This places Red at 0, Yellow at 43, Green
at 85, Cyan at 128, Blue at 213 and Magenta at 213. The S values is 0
for a grayscale image and 255 for a fully saturated color. The
intensity is 0 for black and 255 for white with fully saturated colors at
128. The ColorSegmentor tool takes a color image as input and produces a
single output grey scale image:
The tool performs a segmentation of a color
image by converting the RGB values into HSI values. Then a set
of specified filters are applied. You may set any pixel matching
the filter to a defined value say black = 0. The resulting image
is then output to a specified image which you have created with the
property Active=0. All pixels not matching the filter
specification may be set to a fixed value. Alternatively you may
have either of the HSI images output. Lets go through the necessary steps to apply some color segmenting.
First we create two images:
The im image will load the HSI color model presented
previously, as a color image. This is our input image.
The segmented image will receive the output image from the
color segmentor tool.
When we click on the segmented image
we can set the Active property to un-ticked. This is necessary as the image is not originating from a camera but from a Scorpion tool.
Note: If you forget to do this Scorpion will appear to be hanging
when grabbing images.
The next step to perform is to add a
ColorSegmentor tool. Got to the toolbox - press New and do so.
Then double click on the tool to activate the configuration dialog.
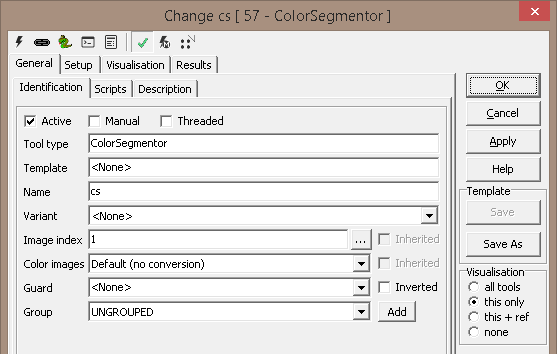
The configuration dialog contains the tabs:
- General
- Setup
- Visualization
- Results
In the General tab we specify the index of the input image
which in this case is 1.
In the Setup tab we will do the
required work to segment the image.
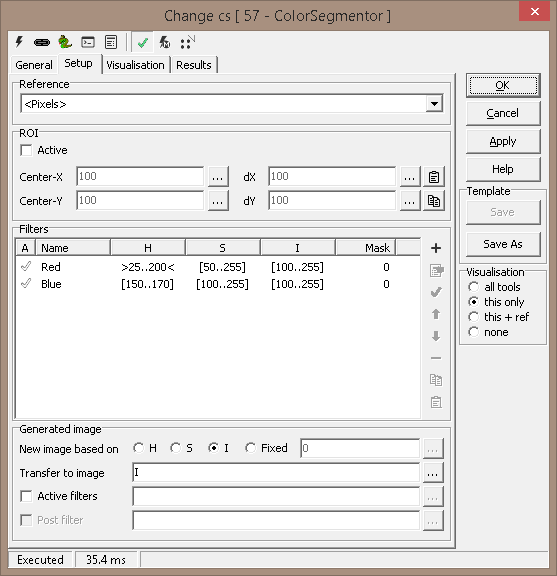
The ROI may be ticked and specified as a sub region of the
input image. If left un-ticked we will operate on the full
image.
Point & Click Clipboard Support
 The rectangular
ROI is defined by four points. The rectangular
ROI is defined by four points.

One point will change the center point.
More on Image Operations.
As usual we may specify a reference for the ROI, but this is not necessary
when we process all of the input image.
The really interesting part is the Filters. By
pressing the + sign we may add new filters. The filters
may be copied and pasted to our convenience, or rearranged in sequence
if desired.
Note that we may specify a range for H, S and I. Also we may
specify a Mask. The regions in the input image matching
the filters will have the mask forced to the mask value in the output
image. In our example we force this value to 0 or black.
We will try to segment out yellow contents. In the HSI model
this equals values centered around 60 degrees. In the 8 bit
representation in the ColorSegmentor tool this maps to an 8bit value
of 42. We add some tolerance to this value to pick up neighboring
colors as well.
We seek values with close to maximum saturation which starts at an
I value of 0.5 or 128 in our case. We add some slack to this
value as well.
We have to specify the Transfer to image property which is
the artificial image segmented we created a few steps ago.
In the example we choose to force all values not matching the filters
to the fixed value of 255. In this way we will binarize the
output image to 0 and 255 where yellowish contents will map to 0.
The Active filters may contain a list of regular expressions separated by
semicolon ";" used for activation of the individual filters by name due to
the regular expressions match.
Finally, the segmented output image may be filtered, see available
filter commands.
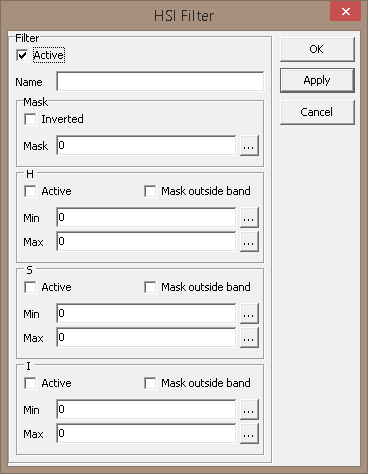
Here is the HSI Filter dialog. Note that
only H and I ranges are specified as we are interested in the full
saturation range 0..1. When applied to the HSI model image this
should result in:
- A black dot where the yellow color is indicated in the HSI cone
- A small pie
- A larger pie
Here is the output which is produced when
we press the Snapshot button followed by the Inspect button.
The result was more or less what we wanted!
The first time you press Inspect, Scorpion will be busy in several
seconds depending on the processing power on the host computer.
This is due to the fact that the first time the tool is run, an RGB
to HSI lookup table is loaded. This LUT is 32MB and consumes
some cpu cycles.
Note : Check Load HSI color conversion file at startup under
Service.General.Options to load the file when starting Scorpion.
Subsequent Inspect will not be penalized and the tool will execute
promptly.

Because HUE is defined as a cyclic value with wraparound between 360 and 0
degrees (in the HSI model), or 255 and 0 8bit values (in our model), we need
to apply a special filter
to cover the range spanning the RED color.
Lets modify our example to pick up red colors.
- Add a new filter S from 50 to 225
- value with S below 50 is normally no color - removing this
filter will add white and black content
- Set the H filter to 10 to 240
- Check Mask outside band
- The following H values are accepted 0 to 10 and 240 to 255

We should now be able to segment red contents Voila! The result image now indicates
that we have isolated:
- The red dot at 0 degrees in the HSI cone
- The small red pie
- The large red pie
Note that you may use the color segmentor to only extract the black
content - no color.
The filter :
will pick up the black contents in the image and yield the
following segmented image:
ExecuteCmd support (see also executeCmd)
|
Command
|
Parameters
|
Return values
|
Comments
|
|
Set |
Object=ROI;Value=<polygon>
Object=ROI;Value=cx,cy,dx,dy |
ok,res
ok,res |
Sets the tool's ROI. See Copy/paste
ROIs for details. |
|
Get |
Object=ROI |
ok,<polygon> |
Current ROI as rectangular, closed polygon |
|
