|
The image analysis in
Scorpion is performed by a toolbox of user configurable tools. You find a
very rich variety of tools in Scorpion. These
are image processing tools in addition to mathematical and logical
tools. They are grouped in 7
categories:
Basic, Data, Geometry, Reference system, Line,
Advanced
tools and 3D.
The are smaller part of really powerful tools.
The main part of the tools are rather
simple, but put together they solve very complicated tasks.
Description
of Scorpion Tools. Using tool
templates the setting of one tool can be same for
tool doing the same task. Tools that are attach to a template class are automatically
updated when the template is changed.
An image
analyzing tool is used to make a calculation. When configuring a vision
system, you decide which tools to use and set their parameter values. The
parameters define the tool setup and are typically coordinates, search
areas (ROI - Region Of Interest), reference points, min/max values, etc.
When run, a tool generates a result given as one or
more values in addition to a set of graphical elements for visualization.
The measuring result is used to define the measured objects state or
status, which again decides if an action, is to be taken.
The visualisation elements are used to illustrate the Scorpion
measurement in the camera image. Each element is given a colour.
Additionally to the image analyses tools, there are
other tools used to further process the analyses results. Two tools of
importance are the logical and Python tools. The Logic tool classifies
results from a set of image analyses tools.
The general elements of a tool is describes
here.
The toolbox menu is
activated right-clicking the mouse.
The toolbar has the following
operations:
 -
New tool - Ctrl-N -
New tool - Ctrl-N
 - Configure - change tool - Ctrl-E
 -
Tool up - Ctrl-U -
Tool up - Ctrl-U
 -
Tool down - Ctrl-D -
Tool down - Ctrl-D
 -
Delete tool - Del -
Delete tool - Del
 -
Active / deactivate - Ctrl-A -
Active / deactivate - Ctrl-A
 -
Set manual execution -
Set manual execution
 -
Visualise all tools -
Visualise all tools
 -
Visualise only selected tool -
Visualise only selected tool
 -
Visualise tool and it's reference tools -
Visualise tool and it's reference tools
 -
No visualisation -
No visualisation
 -
Set Multithreaded -
Set Multithreaded
 -
Execute tool -
Execute tool
 - Open tool result
dialog - Ctrl-R - Open tool result
dialog - Ctrl-R
 - Open tool
dependencies dialog - Ctrl-B - Open tool
dependencies dialog - Ctrl-B
 - Cut tool -
Ctrl-X - Cut tool -
Ctrl-X
 - Copy tool
- Ctrl-C - Copy tool
- Ctrl-C
 - Paste
selected tool - Paste
selected tool
 -
Paste new tool - Ctrl-V -
Paste new tool - Ctrl-V
 -
Help - activate this page -
Help - activate this page
The toolbox consists of an ordered sequence of named tools. They are connected
to an image and an
optional reference system.
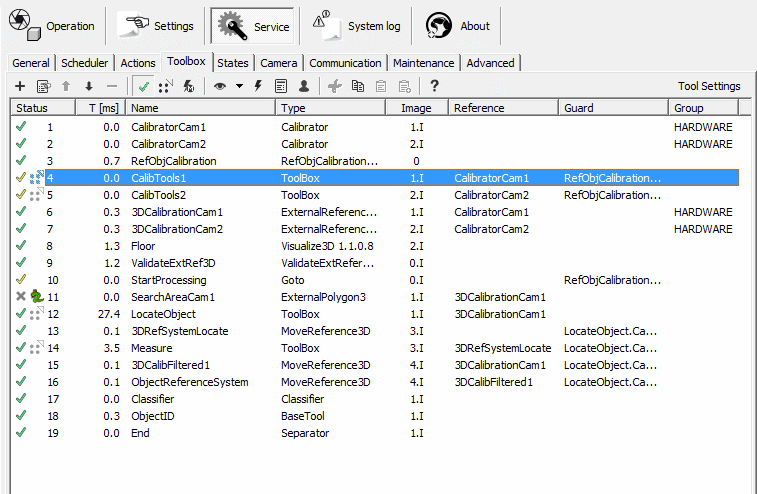
The Toolbox window
The
icon in front of its name indicates the tool’s state after an
inspection.
The icon definitions are as follows:
 Not run
Ok
Not run
Ok  Blocked by guard or
reference Blocked by guard or
reference  Error
or No result Error
or No result
 Not active
 - No license
   - Manual Execution - Manual Execution
 - embedded python scripts
A
system can use several different images in the identification process.
The ‘Image’ column shows which of them the particular tool is
operating on. In our example there is only one image.
In the
‘Reference’ column you find the name of a tool used as reference for
the selected tool. Under ‘Guard’ you can name a tool that must be
successfully run prior to the execution of the selected one.
Select
a tool and press the
button, and you get a list
of other tools using this tool’s results in their calculations. You
are e.g. not allowed to delete a tool if other tools base their
calculations on it.
You can
use the
Visualisation
select a tool in the list and choose
Selection and you see
only the results of this tool in the screen image. Choosing
Selection plus reference
you get the results also from the tools used as reference for the
selected one.
Follow the link to see the most important terms
used in the tool descriptions.
|
